Detecting Initial Access: HTML Smuggling and ISO Images — Part 1
This blog is part one of a two-part series focusing on TTP extraction, Attack Emulation(Purple Teaming), Log Analysis, Threat Hunting, and Threat Detection of HTML Smuggling using the latest NOBELIUM email-based attack.
Initial access is the most important part of an attack. However, it can be easily ignored by many organizations or defenders because of the “Assume Breach” mindset. In this two-part series, I’ll explain how an attack can be detected during its initial access stage and hopefully change the “Assume Breach” mindset for some of you. The series can be considered as a crash course on the below topics:
- Extracting behavioral TTPs from threat intel reports
- Attack emulation(Atomic Adversary Emulation)
- Analyzing logs and generating/validating hypotheses
- Developing detection rules/queries
Let’s get started!
Extracting Behaviors and TTPs
If you haven’t already, please read the report from Microsoft Threat Intelligence Center (MSTIC) below and try to create hypotheses for threat hunting and detection.
For a blue teamer, the report can be summarized as follows:
- An ISO image containing a malicious binary and a shortcut(LNK) file that executes the binary indirectly upon double-clicking(this could have been a direct execution as well).
- An HTML attachment that uses HTML smuggling to deliver the ISO image.
- The ISO image must be mounted by the victim manually, and the shortcut file must be opened.
- Upon mounting the ISO image and double-clicking the shortcut file, the malicious payload runs and connects to the C2 server.
When I read the report, below were my initial thoughts:
- ISO image creation on a computer is normal but can be considered highly suspicious if observed on a non-IT employee workstation or a server.
- Process execution under a mounted image should be highly anomalous.
- Network connection from a process that is executed under a mounted image should be highly anomalous.
- If I can detect image mounts, I can detect this behavior and see if it’s a high fidelity anomalous behavior for triggering an alert.
Without the context provided in the report, it isn’t easy to extract behavioral TTPs, and for me, context is the key. That’s why I personally prefer analyzing threat actors, how they chain the techniques, and which techniques have a relation with other techniques(e.g., brute-force -> valid accounts -> lateral movement). I use this information to generate detection strategies.
I didn’t extract any MITRE ATT&CK techniques from the report because I’m interested in the behavior that is harder to change. Techniques can be replaced with alternatives easily, but behaviors not.
Atomic Adversary Emulation
I don’t particularly appreciate performing atomic tests because it sometimes lacks contextual information, doesn’t tell the exact story, and can be quite misleading. Adversary emulation, on the other hand, takes too much time. That’s why I’ve made up a new term Atomic Adversary Emulation. Atomic adversary emulation is simply emulating a specific phase of an attack.
I used this approach because it’s enough to detect an attack at any phase, not at all phases. Also, focusing on techniques individually takes all the context away. In this example, delivering the HTML attachment to getting the successful Command and Control connection is considered as an attack phase.
The emulation plan for the attack phase as follows:
Preparation(Resource Development)
- Setup Covenant and generate C2 payload (make the payload hidden)
- Create a shortcut file (LNK) that executes C2 payload via rundll32
- Burn an iso image that contains the shortcut file and the payload
- Encode the iso image
- Create an HTML file that uses HTML smuggling
Emulation
- Open the HTML file and save the ISO file it isn’t saved automatically
- Open downloaded ISO image. The ISO image will be mounted automatically
- Double click the shortcut file
- Check the Covenant Console to verify the C2 connection
Preparation(Resource Development)
Setting up Covenant and generating a C2 payload
Covenant is quite easy to install and configure. I had never installed a C2 tool before, and it took me ~30 minutes on a Windows machine, including reading the relevant parts of the documentation.
Note: During the preparation and emulation, disable your AV.
Install Git and Docker
No special configuration is needed. Just perform the default installation.
Install Covenant
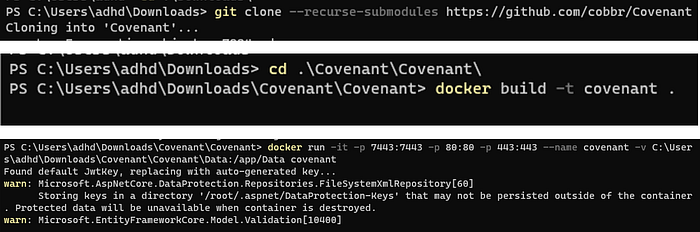
Open a PowerShell window and enter the commands below:
PS> git clone --recurse-submodules https://github.com/cobbr/Covenant
PS> cd Covenant\Covenant\
PS> docker build -t covenant .
PS> docker run -it -p 7443:7443 -p 80:80 -p 443:443 --name covenant -v C:\Users\adhd\Downloads\Covenant\Covenant\Data:/app/Data covenant
The output of the commands should be like below:
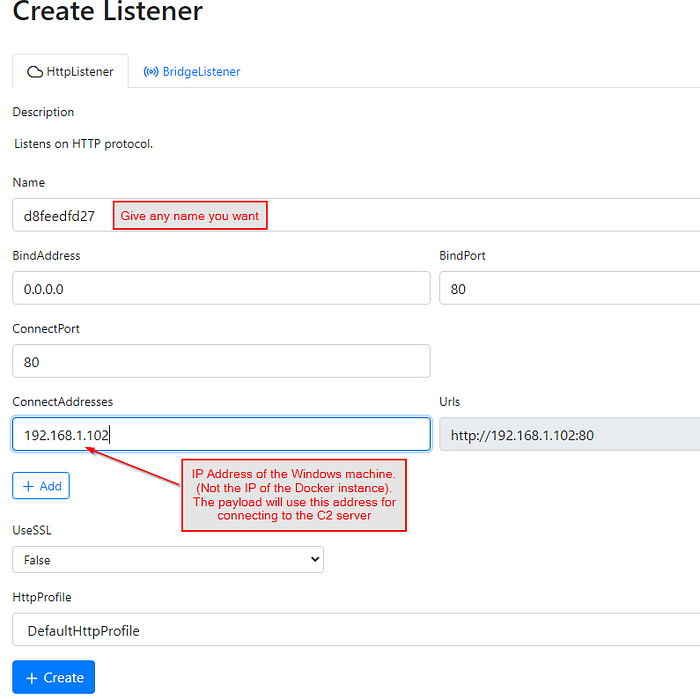
Create a Listener and Generate a C2 payload (Grunt)
- Open a browser and go to
https://localhost:7443 - Register a user(create a user)
- Create a listener
Generate a Launcher(Grunt)
Just generate the Grunt and download it. No need for hosting the payload.

- Rename the Grunt(payload) to “BOOM.exe”
- Open the properties of BOOM.exe and select “Hidden” to make the file hidden (optional).
Create a Shortcut File
Copy an existing shortcut and rename it to “NV”. Then right-click and select properties, remove the “Start in” parameters. Replace the “Target” parameter with "C:\Windows\System32\rundll32.exe advpack.dll,RegisterOCX BOOM.exe. You can change the icon if you want (optional).
Create an ISO Image
Use any image burner (I used AnyBurn and chose “Create image file from files/folder”), and burn the two files (BOOM.exe and NV.lnk).
Base64 Encode the ISO Image
Below PowerShell command converts the ISO image to base64 encoded string and saves it to the NV.txt.
[convert]::ToBase64String(([IO.File]::ReadAllBytes('<PathToISOFile>'))) > NV.txt- Open a text editor and paste the below contents
- Paste the base64 encoded string in the NV.txt without removing the quotes in the code:
We are ready for the emulation!
Emulation
- Copy the HTML file to a target machine(you can use the same machine you use for covenant if you like)
- Open the HTML file. The ISO file will be downloaded automatically. If not, save the file manually.
- Open the ISO file (will be mounted automatically when you open it)
- Double click the “NV” shortcut

Check the Covenant Console
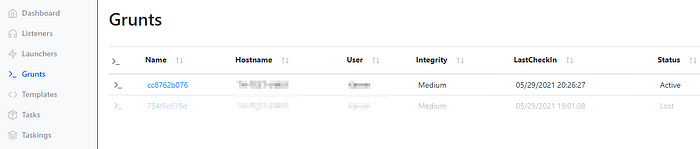
Success! We received the C2 connection.
Next, we will analyze the logs, generate/validate hypotheses and develop detections. Follow the link below.